Ever wonder what life at Clark is like? The five video series I created attempts to answer the beginning of those sort of questions.
Why should students pick your major?
What was your favorite class at Clark?
What is your favorite restaurant close to campus?
What is your favorite campus event?
What is the one thing you look forward to all year?

Friday, July 29, 2011

Monday, July 18, 2011
General campus lolz
My girlfriend and I had dinner on the green the other night, and it was really pretty. But then this squirrel started getting a little close and started to creep us out.
This is after I posted this video to my YouTube channel:
On an unrelated note, I made this Rage Comic last week, which I think sums up my summer pretty well:
Also, more dry ice:
 |
| My little friend got a little close for comfort. |
This is after I posted this video to my YouTube channel:
On an unrelated note, I made this Rage Comic last week, which I think sums up my summer pretty well:

Also, more dry ice:
Sunday, July 10, 2011
How to reuse plastic pipet tip loaders
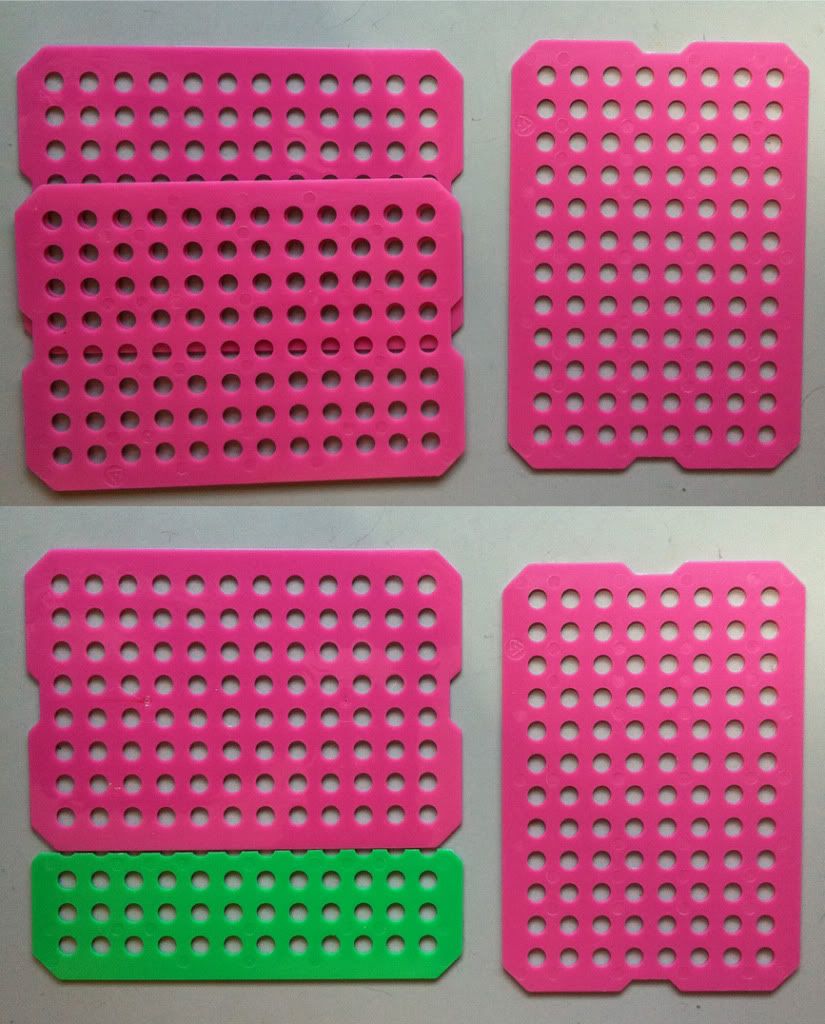
Working in a biology lab, you may have discovered the wonders of boxed pipet tip packs that allow you to quickly load multiple boxes of pipet tips. These boxes of pipet tips are made up of multiple layers of tips stacked on top of each other, separated by plastic sheets (below), which are left behind once you finish a box of pipet tips. I've been collecting these sheets for quite a while and have since found a use for them.
 With some ordinary lab tape, these plastic sheets can be made into handy baskets used to separate lab supplies. By stacking and taping the sheets in different orientations, you can make custom shaped baskets that accommodate tubes, caps, or anything else your lab has generous quantities of.
At first, I made dividers--a square of sheets taped together--that allowed the separation of caps from tubes in our messy lab tube drawer. While this made the messy lab tube drawer a little tidier, I found that making the dividers into baskets (by giving them a bottom) greatly increased their efficiency because I could pick up and shuffle the order of the tubes and caps within the drawer.

 These plastic sheets can be made into a wide variety of different shapes and sizes of baskets. Overlapping the plastic sheets or carefully cutting off a section of a sheet allows you to customize a basket to fit those awkwardly shaped tubes or hold your collection of caps that has gotten out of control.

While you could probably figure it out yourself now that I've given you this awesome idea, and there are definitely a ton of ways to make these baskets, below is a general step-by-step guide to make these crafty creations.
Supplies needed in order to create these crafty creations:
1.) Six or more plastic pipet tip loader sheets.
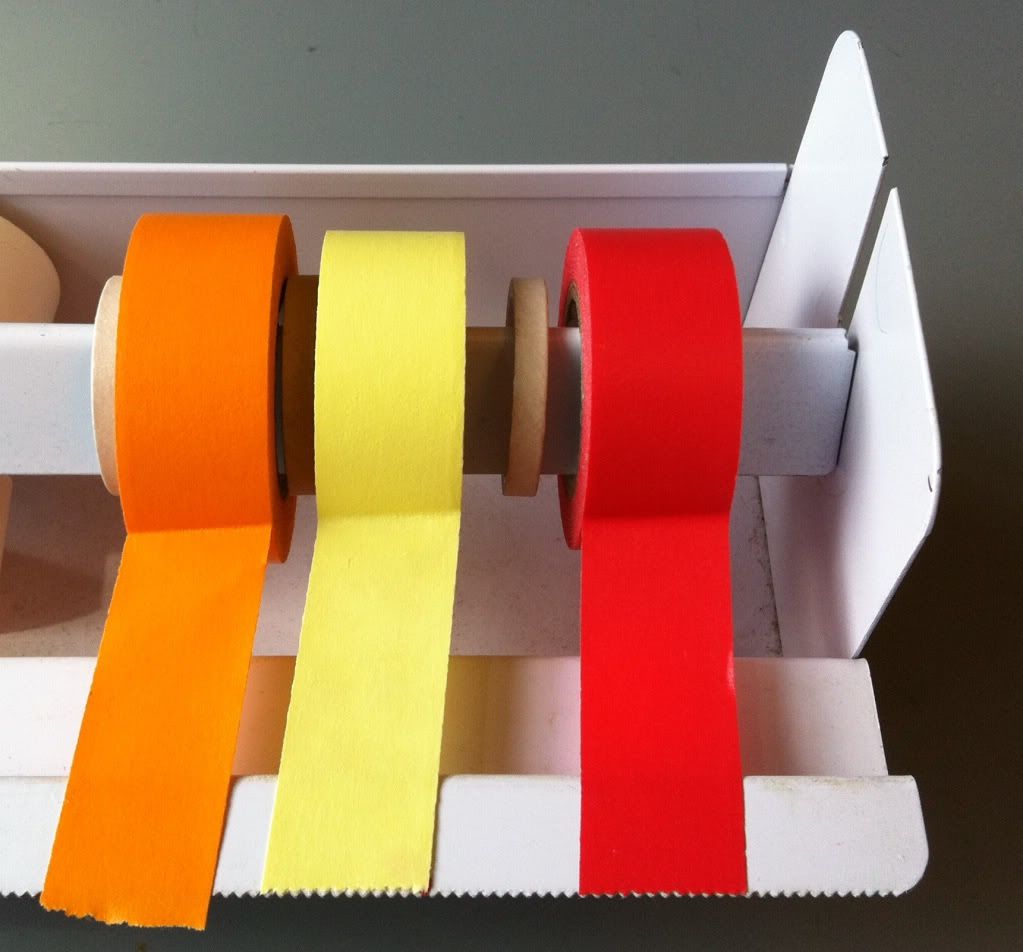
2.) Tape (I used lab tape because it is handy, fairly strong, and comes in a variety of colours).
3.) A cutting device (most people use scissors... which I recommend. Razor blades cut thumbs, but of course I wouldn't know that first hand).
Directions:
1.) Decide the size of the basket you need. I'm making a basic 1 by 1 sheet basket to hold tube caps.
2.) Because these sheets are rectangles, the bottom of the basket will most likely have to be cut and taped together to make a square. I do one of two things:
 Top: you can overlap two sheets to match the length of the basket side.
Bottom: you can trim the second sheet to match the length of the basket side, so the bottom of the basket will lay flush instead of having a slight bump.
I'm going to go the second route and use the spare green piece of plastic sheet to make my bottom. The top option (overlapping sheets) is stronger, but won't sit evenly on a flat surface.
3.) Tape the basket bottom together. Be sure to put tape on either side of the sheets.


 5.) Tape the sides together. First, pull the sides up, perpendicular to the bottom.
Then place a piece of tape on the inside of the sides where they meet. Cut the tape from the top down to the edge of the basket and fold the pieces of tape over. Repeat this step by placing a piece of tape on the outside of the basket sides, cut the tape, and fold the pieces of the tape toward the inside of the basket. Both the inside and the outside of the basket corner top should be covered in tape.
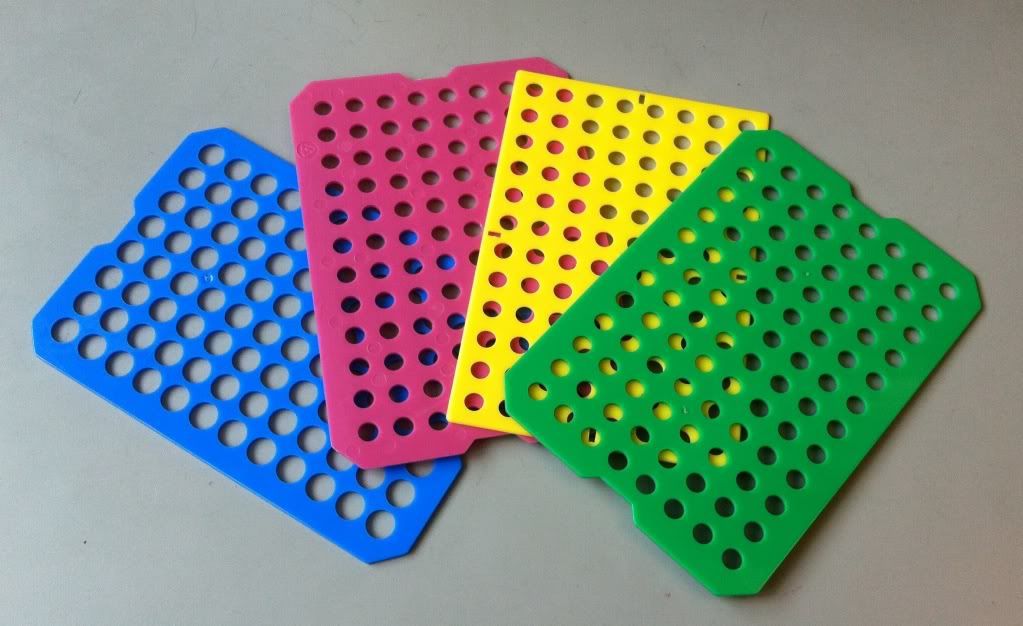 |
| Plastic tip loader sheets, henceforth called plastic sheets. They need a better name. |

At first, I made dividers--a square of sheets taped together--that allowed the separation of caps from tubes in our messy lab tube drawer. While this made the messy lab tube drawer a little tidier, I found that making the dividers into baskets (by giving them a bottom) greatly increased their efficiency because I could pick up and shuffle the order of the tubes and caps within the drawer.
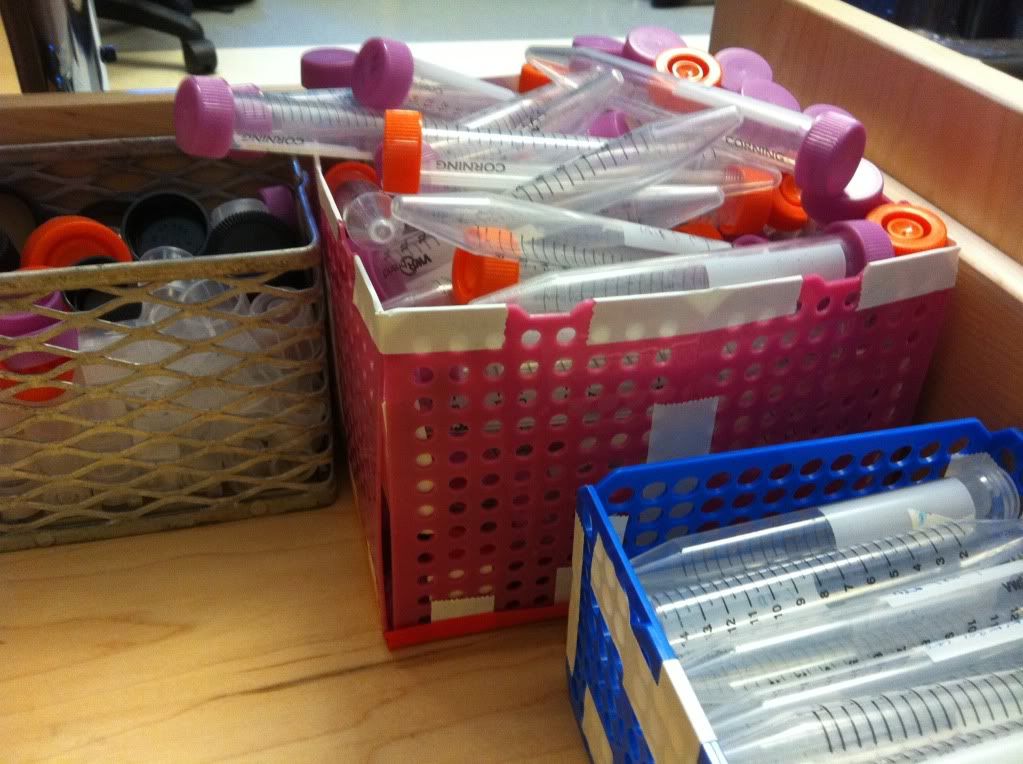

While you could probably figure it out yourself now that I've given you this awesome idea, and there are definitely a ton of ways to make these baskets, below is a general step-by-step guide to make these crafty creations.
Supplies needed in order to create these crafty creations:
1.) Six or more plastic pipet tip loader sheets.
2.) Tape (I used lab tape because it is handy, fairly strong, and comes in a variety of colours).
3.) A cutting device (most people use scissors... which I recommend. Razor blades cut thumbs, but of course I wouldn't know that first hand).
Directions:
1.) Decide the size of the basket you need. I'm making a basic 1 by 1 sheet basket to hold tube caps.
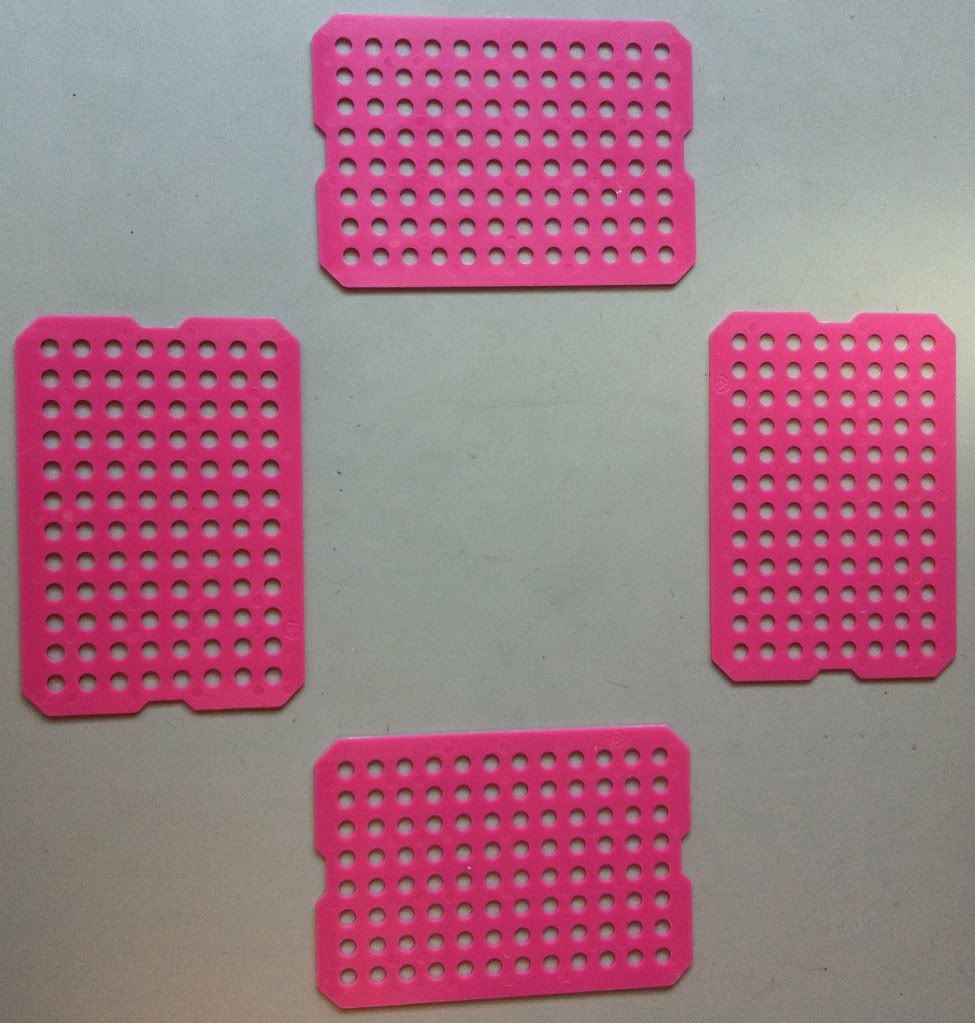 |
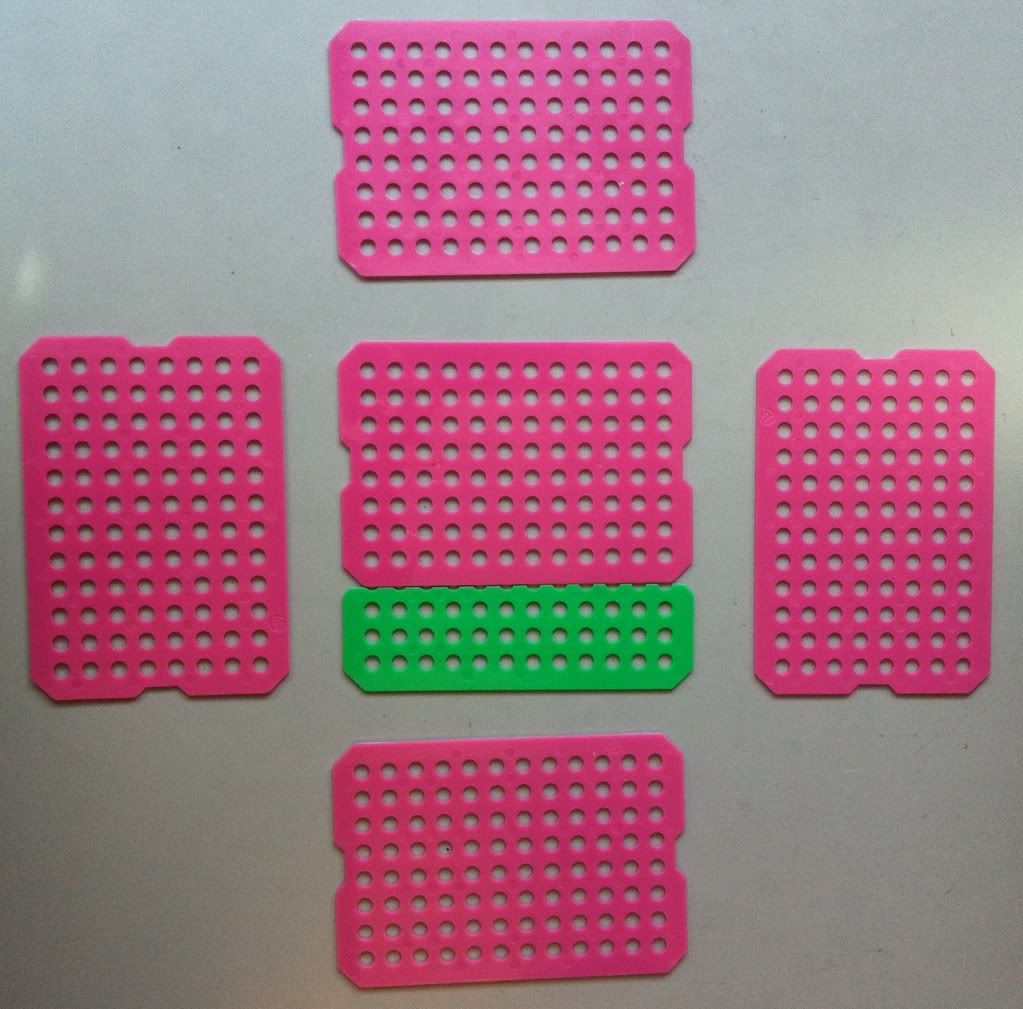
| One sheet by one sheet (these will be the side of the basket). |
Bottom: you can trim the second sheet to match the length of the basket side, so the bottom of the basket will lay flush instead of having a slight bump.
I'm going to go the second route and use the spare green piece of plastic sheet to make my bottom. The top option (overlapping sheets) is stronger, but won't sit evenly on a flat surface.
 |
| With the bottom of the basket sized up, it's time to start taping this bad boy together. Professor! Where do we keep our tape? |
3.) Tape the basket bottom together. Be sure to put tape on either side of the sheets.
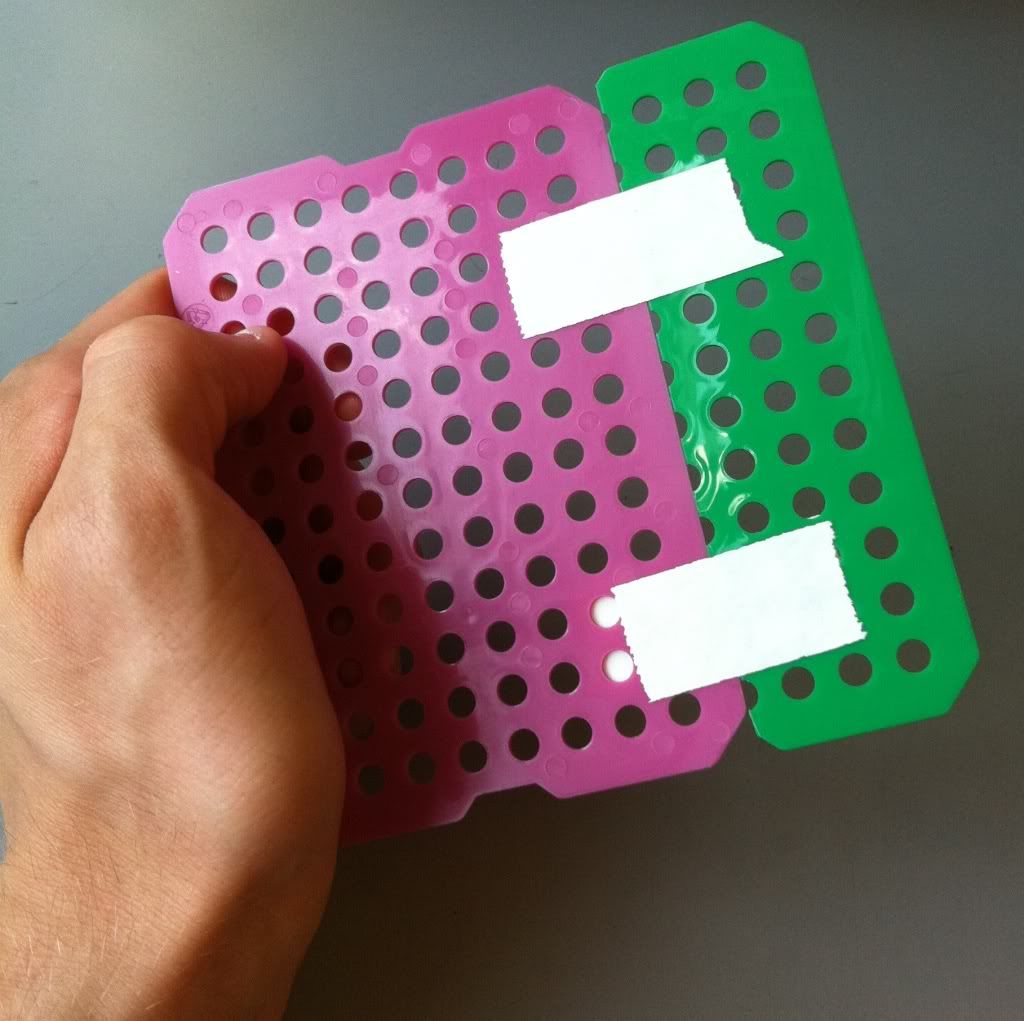
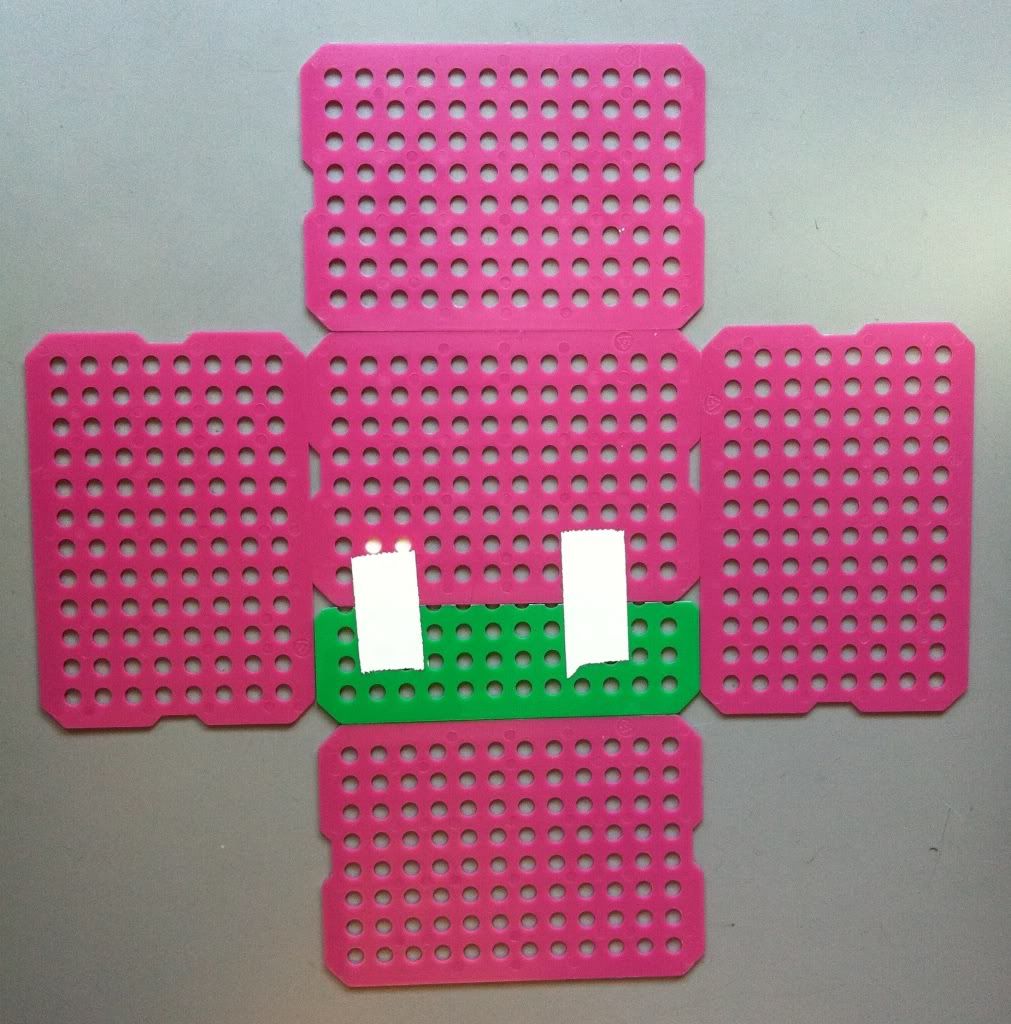
4.) Tape the four sides of the basket onto the bottom. I do NOT tape the outside of the bottom to each side just yet, because the tape usually rips. I tape the bottom to the sides once the basket is erected.
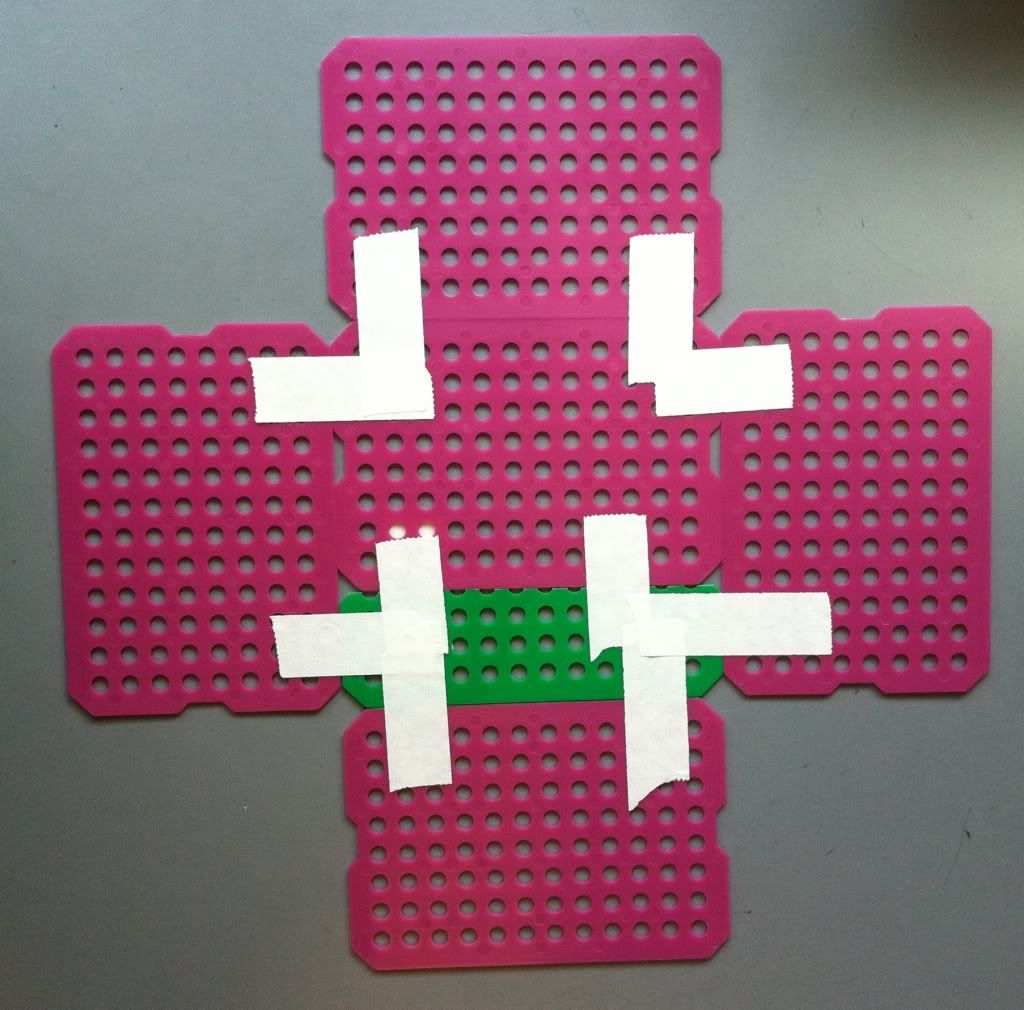
 5.) Tape the sides together. First, pull the sides up, perpendicular to the bottom.
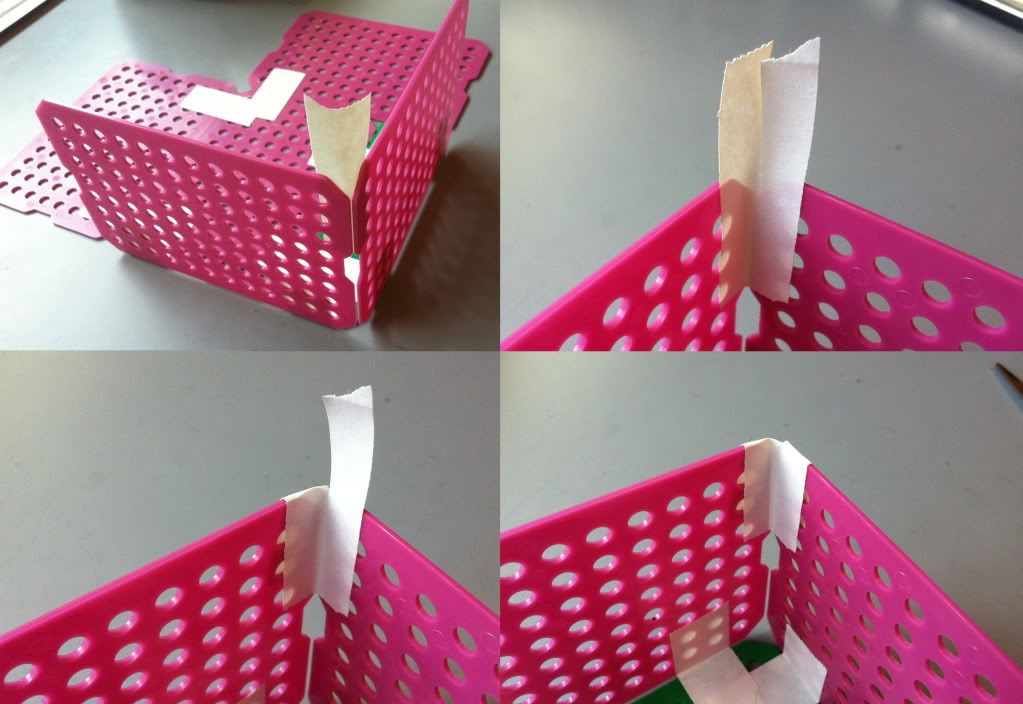 |
| Go top left to top right, to bottom left to bottom right. |
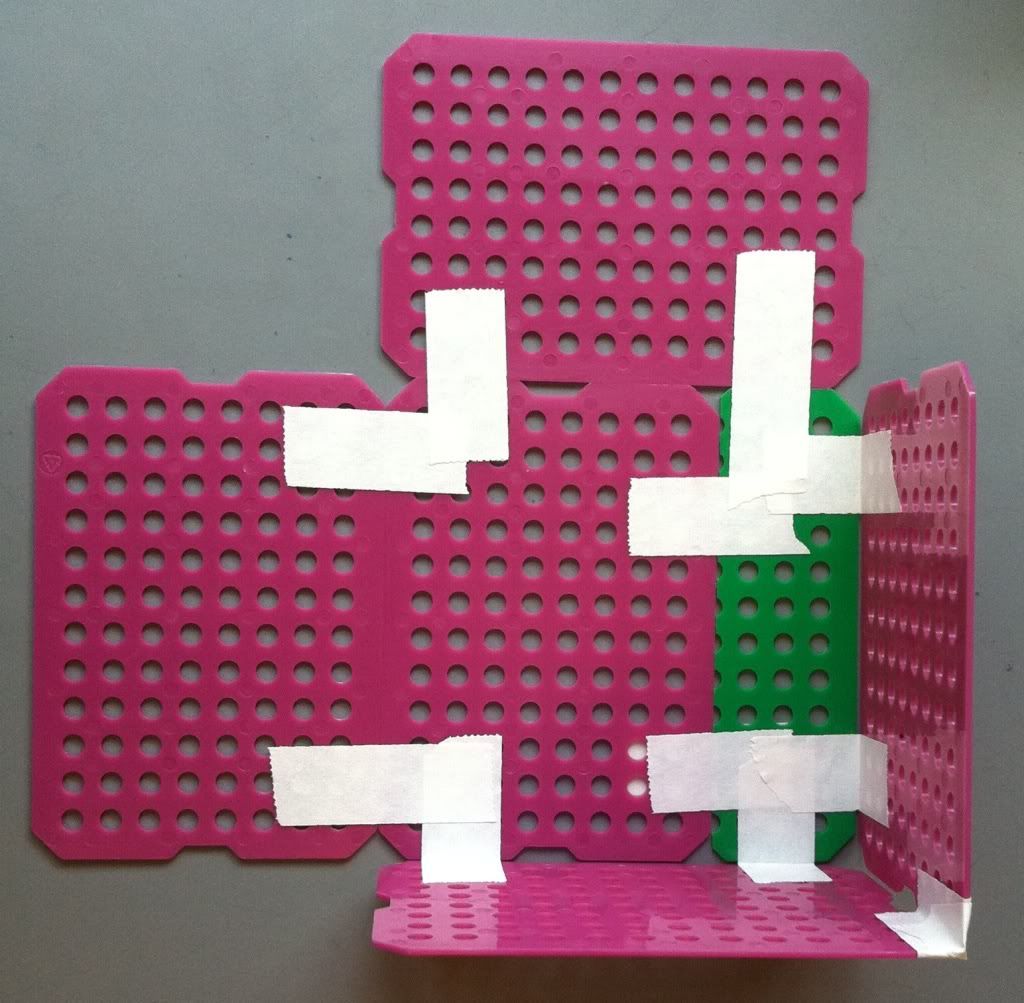 |
| Two sides taped to one another. |
6.) Tape all four of the sides together. Now your basket is (essentially) completed.

7.) To increase the integrity of the bottom of the basket, a piece of tape along each edge of the bottom taping the bottom to the side of the basket is a good idea. The easiest place to tape is on the outside; if you really want the bottom of the basket to stay attached the sides you can try taping the inside of the bottom to the sides as well. You can also put more take along the corners where the sides of the basket meet each other.
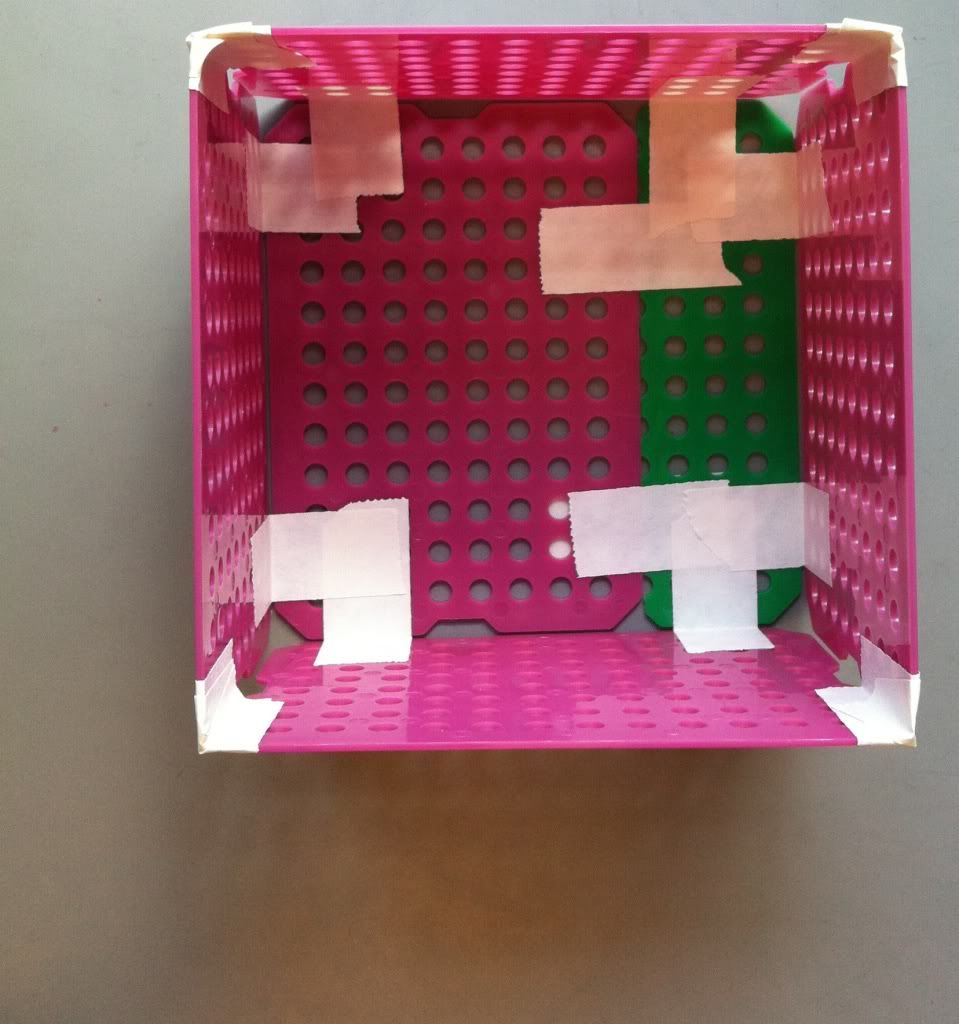 |
| Looking pretty spiffy! |
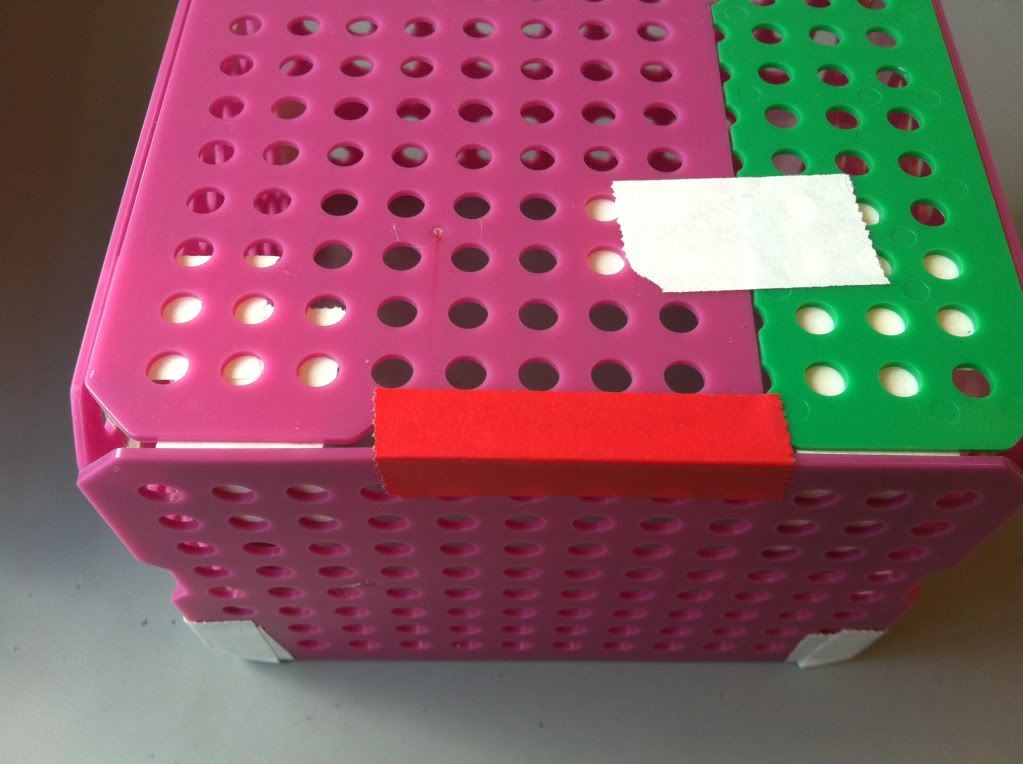
7.) To increase the integrity of the bottom of the basket, a piece of tape along each edge of the bottom taping the bottom to the side of the basket is a good idea. The easiest place to tape is on the outside; if you really want the bottom of the basket to stay attached the sides you can try taping the inside of the bottom to the sides as well. You can also put more take along the corners where the sides of the basket meet each other.
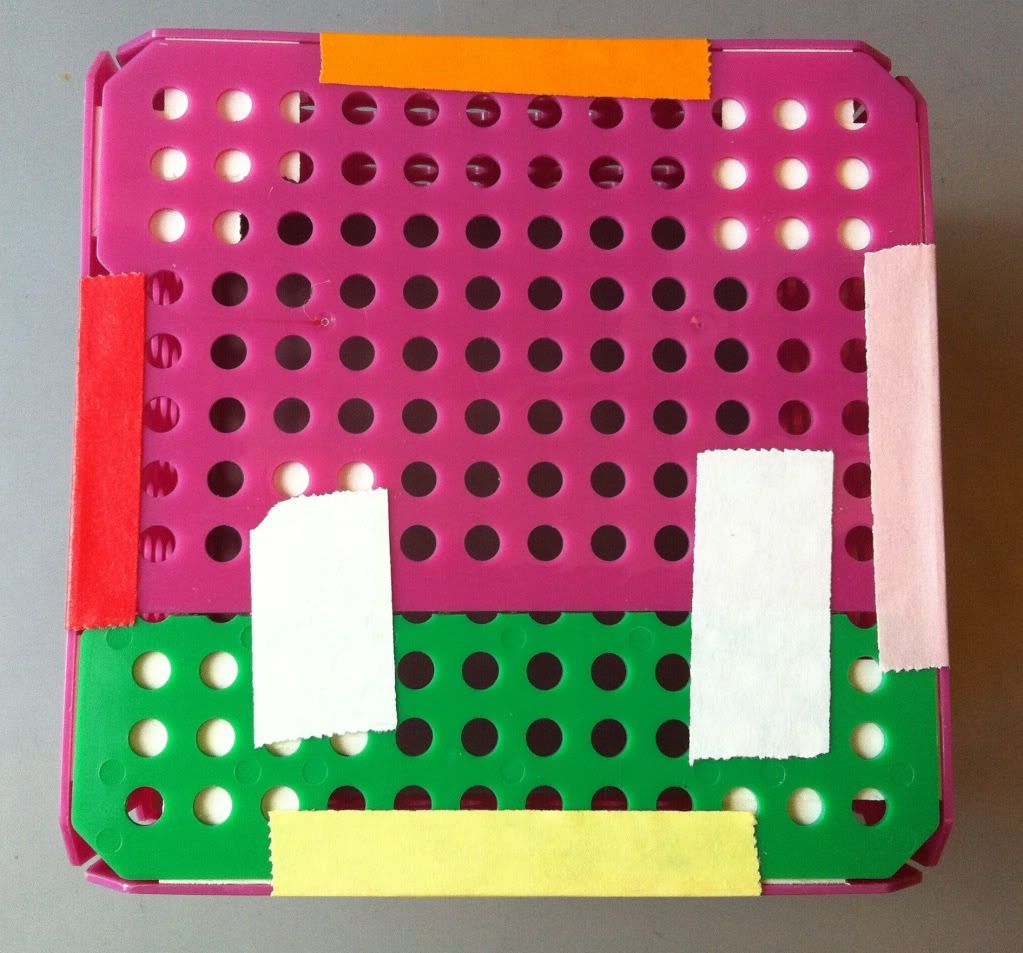 |
| The yellow, red, pink (which isn't very pink), and orange pieces of tape keep the bottom of the basket attached to each side of the basket. |
For a more professional look:
- Try overlapping the plastic sheets to make a customized fit rather than cutting sheets and taping them together. Less tape may look better.
- Cut the edge of your pieces of tape for a flat edge instead of the standard wavy edge you get from the tape dispenser.
- Use only one color of plastic sheet and stick to only one color of tape (I hope you already thought of this.)
> > Feel free to e-mail me with questions and comments.
Thursday, July 7, 2011
Saturday, July 2, 2011
Sup July? SUP SUCCESSFUL TRANSFORMATIONS?
I've been having trouble transforming E. coli cells with my plasmid vector, within which is a small DNA fragment (my NiR terminator) that I will want to restriction cut out. By transforming bacteria with the plasmid vector, I'll make additional copies of the plasmid and be able to freeze and save the plasmid for later use if necessary.
My lab mates and I spent several weeks trying to figure out why our transformations were doing so poorly and why we were receiving such low plasmid yields from transformed bacteria. I myself figured out that one problem was the ampicillin used to make the agar plates upon which we grow our bacteria had degraded over time, and that the antibiotic was not selecting strongly enough to weed out bacteria with plasmids and bacteria without plasmids. This is the reason why we were not getting good plasmid yields and another reason why our bacteria were not growing when transferred from "old" plates to new agar plates with freshly made ampicillin.
We also concluded that the bacteria cells we were transforming were not up to par to yield the results we needed, so we ordered some new transformation kits.
But in order to successfully clone PCR product into a plasmid vector to transform into bacteria, the PCR product needs to be freshly made. In order to get new PCR product, I re-amplified older PCR product in the same reaction I ran before. I ran four different reactions using the PCR DNA in four different DNA concentrations: 1:1, 1:10, 1:100, & 1:1,000 (lanes 2, 3, 4 & 5 in the picture below respectively). This way I can determine which reaction had too much starting DNA and too little. After my reaction, I ran part of it on a gel to see how each reaction went. I definitely got much larger yields in the 1:1 & 1:10 dilutions (there was probably too much DNA even), so I used the second dilution (1:100, lane 4) to clone into the plasmid vector.
Using the vector plasmid, I transformed them into the bacteria and let them grow over night on an agar plate. I then performed a colony screen, which is a PCR reaction using single bacteria colonies to supply the DNA. That PCR reaction yielded the below gel:
What we're seeing in this gel is the molecular ladder at the top and then 10 different colony screen reactions. They're pretty streaky, which is probably because there was a lot of bacterial DNA in each PCR reaction. What I wanted was a single band at around 700 basepairs, which is roughly half way between the two second most right bands on the ladder. As such, lanes 4, 6, 7 & 8 are good candidates for colonies that have my plasmid with the correct insert.
BRB time for the holiday weekend!
My lab mates and I spent several weeks trying to figure out why our transformations were doing so poorly and why we were receiving such low plasmid yields from transformed bacteria. I myself figured out that one problem was the ampicillin used to make the agar plates upon which we grow our bacteria had degraded over time, and that the antibiotic was not selecting strongly enough to weed out bacteria with plasmids and bacteria without plasmids. This is the reason why we were not getting good plasmid yields and another reason why our bacteria were not growing when transferred from "old" plates to new agar plates with freshly made ampicillin.
We also concluded that the bacteria cells we were transforming were not up to par to yield the results we needed, so we ordered some new transformation kits.
But in order to successfully clone PCR product into a plasmid vector to transform into bacteria, the PCR product needs to be freshly made. In order to get new PCR product, I re-amplified older PCR product in the same reaction I ran before. I ran four different reactions using the PCR DNA in four different DNA concentrations: 1:1, 1:10, 1:100, & 1:1,000 (lanes 2, 3, 4 & 5 in the picture below respectively). This way I can determine which reaction had too much starting DNA and too little. After my reaction, I ran part of it on a gel to see how each reaction went. I definitely got much larger yields in the 1:1 & 1:10 dilutions (there was probably too much DNA even), so I used the second dilution (1:100, lane 4) to clone into the plasmid vector.
 |
| I used PCR product from lane 4 to clone into a vector plasmid for the transformation. |
 |
| While this is a slightly messy colony screen gel, several of these colonies should suffice! |
What we're seeing in this gel is the molecular ladder at the top and then 10 different colony screen reactions. They're pretty streaky, which is probably because there was a lot of bacterial DNA in each PCR reaction. What I wanted was a single band at around 700 basepairs, which is roughly half way between the two second most right bands on the ladder. As such, lanes 4, 6, 7 & 8 are good candidates for colonies that have my plasmid with the correct insert.
BRB time for the holiday weekend!
Thursday, June 23, 2011
What's up graduate student office?
I grew up liquid bacteria cultures last night so I could harvest their plasmids this morning, but alas, my liquid cultures didn't grow overnight. They looked this morning pretty much like they did last night:
 I grew four different cultures last night from the same bacteria colony. This colony I has semi-recently used for a plasmid harvest (plasmid prep), so I was shocked to see they hadn't grown. On the left (the darker cultures) is 2xYT buffer (2 times the amount of Yeast Extract Tryptone), an especially nutrient-rich media, and on the right (the lighter cultures) is the standard LB broth (which I just learned from Wikipedia is commonly incorrectly called Luria broth). I set up one of each culture at 1 volume and 2 volumes of the antibiotic ampicillin. I usually grow my cultures at 2 volumes (100µg of amp per milliliter). The amount of antibiotic is very important--let me explain: we're growing these bacteria for their plasmids (sort of like growing people for organs, like in the movie The Island--sorry if I spoiled that one for you hahahaha), and the plasmids have a gene for antibiotic resistance in addition to the other parts of DNA we're cloning the plasmids for (click here for a 101 post on plasmids). Therefore, any bacteria that have a plasmid should be able to survive in the presence of ampicillin. This means we need to add ampicillin to our cultures, to weed out the bacteria that don't have the plasmid. However, if we add too little ampicillin, some bacteria that don't have the resistance gene (from the plasmid) may still be able to survive. If we add too much ampicillin, none of the cells may survive. It's a catch-22: too many bacteria cells (especially those without the plasmid) due to no or too little ampicillin, will give us poor plasmid harvest yields. (This is particularly problematic because bacteria without the plasmid may end up growing faster than counterparts with plasmids, because they don't have to invest the energy into making the plasmids.) However on the other end, too much ampicillin will prevent the growth of cells and I won't get any cells to harvest their plasmids.
In my case, my bacteria colonies were probably too old to start new liquid cultures from. Bacteria colonies are best used if they are actively growing, because they are their healthiest at that point. We'll have to see if I can get these current colonies to grow anymore.
In other news, I'm using my new graduate student desk (which I'm sharing with my labmate Jessica):

It's pretty cool to have a space in the graduate student office, because now I finally feel like a graduate student at Clark. Just settling in as you can see. Jess and I will be using this space primarily to do our reading and writing, but it could also be used to plan out experiments, do research, etc.

In my case, my bacteria colonies were probably too old to start new liquid cultures from. Bacteria colonies are best used if they are actively growing, because they are their healthiest at that point. We'll have to see if I can get these current colonies to grow anymore.
In other news, I'm using my new graduate student desk (which I'm sharing with my labmate Jessica):

It's pretty cool to have a space in the graduate student office, because now I finally feel like a graduate student at Clark. Just settling in as you can see. Jess and I will be using this space primarily to do our reading and writing, but it could also be used to plan out experiments, do research, etc.
Wednesday, June 22, 2011
Science is still not being linear (enhanced with video!)
So science is still not being linear for me, as I continue to have problems with my PCReactions.
I ran the gel this morning, and got this:
Aaaaaand I got nothing, beside the positive control (lane 6, 2 lanes above the bottom ladder).
I ran the gel this morning, and got this:
 |
| Lanes: 1 - 1 kb ladder; 2-5 - PCR reactions; 6 - positive control; 7 - negative control; 8 - 50 bp ladder |
Monday, June 20, 2011
Sometimes science isn't linear (and I'm not talking about exponential growth)
Sometimes science (my project) isn't linear, and I've been getting caught up in this recently with my posting.
I wanted to do a series of posts and videos on the process of transformation and the completion of my first NiR plasmid, but what I found was that sometimes things don't work out the way you want.
So, let me backtrack a bit.
As I mentioned before, it appears I have transformed bacteria colonies that have my PCR insert. Great! But I've been having trouble getting the insert to amplify out of the plasmid once again. I grew up several bacteria colonies that looked like they had my insert (white colonies on X-gal) and performed a plasmid prep that yielded very little plasmid DNA. I need a decent amount of this plasmid to allow me to digest (cut) out and obtain the insert.
Now, I'm trying to do yet another PCR reaction in a much larger volume (50µl rather than 10-20µl) using the plasmids I obtained from my lame plasmid prep. If this works, I'll have a lot of copies of the NiR terminator insert, which I can then slice off the ends with restriction enzymes. Then, the insert would be ready for the next step.
That is, if I can get this to work. :-\
I wanted to do a series of posts and videos on the process of transformation and the completion of my first NiR plasmid, but what I found was that sometimes things don't work out the way you want.
So, let me backtrack a bit.
As I mentioned before, it appears I have transformed bacteria colonies that have my PCR insert. Great! But I've been having trouble getting the insert to amplify out of the plasmid once again. I grew up several bacteria colonies that looked like they had my insert (white colonies on X-gal) and performed a plasmid prep that yielded very little plasmid DNA. I need a decent amount of this plasmid to allow me to digest (cut) out and obtain the insert.
Now, I'm trying to do yet another PCR reaction in a much larger volume (50µl rather than 10-20µl) using the plasmids I obtained from my lame plasmid prep. If this works, I'll have a lot of copies of the NiR terminator insert, which I can then slice off the ends with restriction enzymes. Then, the insert would be ready for the next step.
That is, if I can get this to work. :-\
Tuesday, June 14, 2011
It's Transformation Time.
Last time I checked in, my PCR reactions that were supposed to add restriction sites to either end of the nitrite reductase (NiR) terminator region appeared to work and work well. When I ran the PCR reactions on a gel, the amplified DNA bands were really strong and were the correct length.
 This gave me the go ahead to continue the path in isolating & altering the NiR terminator in order to yield a sequence of DNA to fit the final NiR plasmid for my project's experiments.
Now I need to insert the NiR terminator into a vector plasmid, transform it into bacteria, and digest the NiR terminator back out of the plasmid to double check that the terminator I got on the gel from my PCR reaction (above) is the correct piece of DNA before I insert it into the NiR plasmid to complete the final NiR plasmid.
We use bacteria to amplify pieces of DNA because of their quick generation times. If you insert a plasmid into bacteria, they will duplicate the plasmid as if it were their own DNA as they grow and divide. A plasmid is a ring of DNA, which is essential for this to work, because bacteria will cut up and destroy any loose pieces of linear DNA. In order to get our NiR terminator to be duplicated by the bacteria, we insert it into a vector plasmid first. The vector plasmid is designed to accept small pieces of DNA from PCR reactions, lock in that piece of DNA within the plasmid. This plasmid can then be transformed into bacteria.
Bacterial transformation is really easy. Once the vector plasmid complete with our PCR DNA is ready, we add the plasmids to specially-altered E. coli cells, incubate the cells on ice for a short time (to lull them into a false sense of security), and then transfer them to a hot water bath (42°C) for thirty seconds. Thirty seconds is all we need for the bacteria cells to panic and scream "WHAT IS HAPPENING TO ME?" This prompts the bacteria, because they are stressed, to take up any DNA in their environment. Well good thing the only DNA in their environment is the plasmid we gave them! Through the heat shock, a large amount of bacteria should have taken up our plasmid. We then grow the bacteria over night while they recuperate, divide exponentially, and make copies of our plasmid. This process is summarized by the cartoon below:

Now I need to insert the NiR terminator into a vector plasmid, transform it into bacteria, and digest the NiR terminator back out of the plasmid to double check that the terminator I got on the gel from my PCR reaction (above) is the correct piece of DNA before I insert it into the NiR plasmid to complete the final NiR plasmid.
We use bacteria to amplify pieces of DNA because of their quick generation times. If you insert a plasmid into bacteria, they will duplicate the plasmid as if it were their own DNA as they grow and divide. A plasmid is a ring of DNA, which is essential for this to work, because bacteria will cut up and destroy any loose pieces of linear DNA. In order to get our NiR terminator to be duplicated by the bacteria, we insert it into a vector plasmid first. The vector plasmid is designed to accept small pieces of DNA from PCR reactions, lock in that piece of DNA within the plasmid. This plasmid can then be transformed into bacteria.
Bacterial transformation is really easy. Once the vector plasmid complete with our PCR DNA is ready, we add the plasmids to specially-altered E. coli cells, incubate the cells on ice for a short time (to lull them into a false sense of security), and then transfer them to a hot water bath (42°C) for thirty seconds. Thirty seconds is all we need for the bacteria cells to panic and scream "WHAT IS HAPPENING TO ME?" This prompts the bacteria, because they are stressed, to take up any DNA in their environment. Well good thing the only DNA in their environment is the plasmid we gave them! Through the heat shock, a large amount of bacteria should have taken up our plasmid. We then grow the bacteria over night while they recuperate, divide exponentially, and make copies of our plasmid. This process is summarized by the cartoon below:

Tuesday, June 7, 2011
Apparently I've trained my bacteria really well...
...look what they did last night!
 They're super neat! ^,^

Subscribe to:
Posts (Atom)